2 hours to master RxSwift - Part 3

Introduction
In the previous post: 2 hours to master RxSwift - Part 1 (needone.app) and 2 hours to master RxSwift - Part 2 (needone.app), we get to know the the core concept behind the RxSwift and how RxSwift works. In this tutorial, we are going to combine what we learnt with MVVM.
Section 1: MVVM
Model-View-ViewModel is a software architectural pattern that is commonly used in the mobile development. It isolates the data and views by introducing the intermediary layer named viewModel.
Here is the workflow diagram of the MVVM.
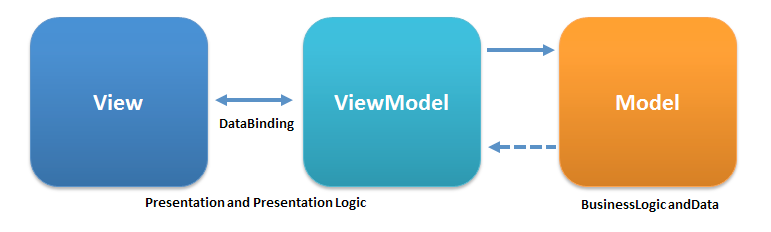
Model: Model represent the objects we will use. For example, we need to fetch the users from API, then we will create a model user to handle that.
View: We use either SwiftUI or UIKit to represent the UI elements, such as a form, or charts on the screen.
ViewModel: represents the business logic of the application. For example, the api user might a json from remote including firstName, lastName. However, we are required to display the full name in the end. So We need to create a function in the ViewModel to assemble the name.
Notice that ViewModel is dataBinding with View meaning whenever there is a change on either View or ViewModel, a certain action is triggerred to response that. For example, we want to validate user's name (contains invalide characters, username is already taken, etc) when user is typing without hit a button to submit the form. Fortunately, this is quite easy to achieve with the help from RxSwift. We can easily bind the UITextFiled to the ViewModel.
Section 2: Example of using RXSwift in MVVM
As we don't have any API or database call here, so we don't have the Model in the following example.
View:
import UIKit
import RxSwift
import RxCocoa

enum MyError: Error {
  case someError
}

class ViewController: UIViewController {

  @IBOutlet weak var emailTextField: UITextField!
  @IBOutlet weak var emailErrorInfo: UILabel!

  @IBOutlet weak var mobileTextField: UITextField!
  @IBOutlet weak var mobileErrorInfo: UILabel!

  let disposeBag = DisposeBag()
  var viewModel: ViewModel?

  override func viewDidLoad() {
    super.viewDidLoad()
    // Do any additional setup after loading the view.

    viewModel = ViewModel()
    setupBinding()
  }

  func setupBinding() {
    emailTextField.rx.text.changed.subscribe(onNext: {
      guard let text = $0, let viewModel = self.viewModel else { return }
      self.emailErrorInfo.text =
      viewModel.validateEmail(email: text) ?
        "" :
        "Invalid character"
    }).disposed(by: disposeBag)


    mobileTextField.rx.text.changed.subscribe(onNext: {
      guard let text = $0, let viewModel = self.viewModel else { return }
      self.mobileErrorInfo.text =
        viewModel.validateMobile(mobile: text) ?
          "" :
          "Invalid character"
    }).disposed(by: disposeBag)
  }
}
ViewModel
import Foundation

final class ViewModel {


  func validateEmail(email: String) -> Bool {
    // sophisticated logic to validate the email, here just simply to check "!"
    let emailRegEx = "^(?:(?:(?:(?: )*(?:(?:(?:\\t| )*\\r\\n)?(?:\\t| )+))+(?: )*)|(?: )+)?(?:(?:(?:[-A-Za-z0-9!#$%&’*+/=?^_'{|}~]+(?:\\.[-A-Za-z0-9!#$%&’*+/=?^_'{|}~]+)*)|(?:\"(?:(?:(?:(?: )*(?:(?:[!#-Z^-~]|\\[|\\])|(?:\\\\(?:\\t|[ -~]))))+(?: )*)|(?: )+)\"))(?:@)(?:(?:(?:[A-Za-z0-9](?:[-A-Za-z0-9]{0,61}[A-Za-z0-9])?)(?:\\.[A-Za-z0-9](?:[-A-Za-z0-9]{0,61}[A-Za-z0-9])?)*)|(?:\\[(?:(?:(?:(?:(?:[0-9]|(?:[1-9][0-9])|(?:1[0-9][0-9])|(?:2[0-4][0-9])|(?:25[0-5]))\\.){3}(?:[0-9]|(?:[1-9][0-9])|(?:1[0-9][0-9])|(?:2[0-4][0-9])|(?:25[0-5]))))|(?:(?:(?: )*[!-Z^-~])*(?: )*)|(?:[Vv][0-9A-Fa-f]+\\.[-A-Za-z0-9._~!$&'()*+,;=:]+))\\])))(?:(?:(?:(?: )*(?:(?:(?:\\t| )*\\r\\n)?(?:\\t| )+))+(?: )*)|(?: )+)?$"
    let emailTest = NSPredicate(format:"SELF MATCHES %@", emailRegEx)
    let result = emailTest.evaluate(with: email)
    return result
  }

  func validateMobile(mobile: String) -> Bool {
    // sophisticated logic to validate the mobile, here just simply to check "!"
    let phoneRegex = "^d{10}$"
    let phoneTest = NSPredicate(format: "SELF MATCHES %@", phoneRegex)
    return phoneTest.evaluate(with: mobile)
  }
}
We can easily test our viewModel methods:
func testExample() throws {
  let viewModel = ViewModel()
  XCTAssertTrue(viewModel.validateEmail(email: "[email protected]"))
  XCTAssertFalse(viewModel.validateMobile(mobile: "12345678900"))
}